Trap Post Tuesday #1
Recently I started posting various photos of boobytraps on my facebook page, and a large number of you have expressed interest in not just mantraps but the more common and infinitely more useful animal traps. So I decided to transcribe a few entries from some of my favorite books to give a more adequate detailing of these intricate mechanisms. I hope they come in useful to you.
The Bow Trap (Camp Life in the Woods)
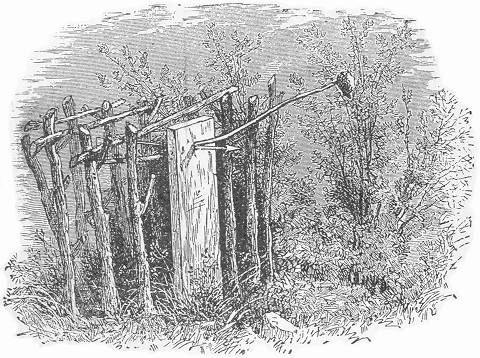
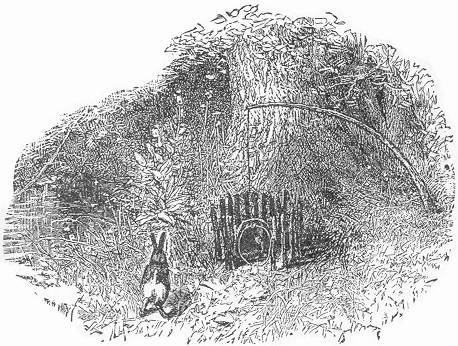
It is easily constructed as follows: First cut a stout board five inches in width, two and a half feet in length and about two inches in thickness. Shave off one end to a point so that it may be driven into the ground. At the other extremity, in the middle of the board and about two inches from the edge, a hole one half an inch in diameter and three quarters of an inch in height, should be made; two auger holes, one directly above the other with the sides flatly trimmed, will answer perfectly. The arrow should next be constructed. This should be made of seasoned oak or ash, two feet in length, perfectly straight, smooth and round, and one third of an inch in diameter. One end should be notched for the bow string and vaned with thin feathers after the manner of ordinary arrows. The other extremity should be armed with a steel barb sharply pointed, and firmly riveted in place. Any blacksmith can forge such a tip; the shape of which is plainly seen in our engraving. The bow should consist of a piece of stout seasoned hickory, oak or ash four feet long, if such a bow is not at hand, a stout sapling may be used. The bow string may consist of cat-gut, or stout Indian twine.
Before setting the trap, it is advisable to attract the game to
the spot selected as already alluded to in connection with the
gun trap, and particularly so when the Puma is the victim sought.
In our illustration we see the trap as it appears when set, and
the same precaution of aiming at some tree should be exercised
as advise with the gun trap. The bow should first be secured in
place directly beneath and one eighth of an inch from the edge
of the hole in the board, as seen at (a). Two large wire
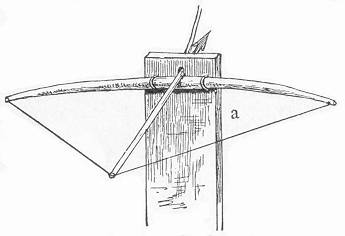 staples may be used for this purpose, being passed over the bow
through holes in the board and clinched on the opposite side. The
bend of the bow and length of string should now be determined, one
end of the latter being attached to the tip of the bow and the
other end supplied with a loop. The board should then be driven
into the ground to the depth of about eight inches. We will next
take up the arrow. Pass the barb through the hole in the board
and adjust the notch over the bow-string, draw the arrow back and
release the string. If the arrow slide easily and swiftly, through
the board, keeping true to its aim, the contrivance is in perfect
working order and is ready to be set. This is accomplished by the
very simple and ingenious mechanical arrangement, shown at (b).
On
the under side of the arrow just behind the barb, a flat notch
one eighth of an inch in depth and two and a half inches in length
is cut, with rounded ends, as seen in the illustration. The bait
stick should consist of a sapling about three feet in length, the
large end being trimmed so
as to fit in the hole over the arrow while the notch in the latter
rests in the bottom of the aperture as seen in the illustration
staples may be used for this purpose, being passed over the bow
through holes in the board and clinched on the opposite side. The
bend of the bow and length of string should now be determined, one
end of the latter being attached to the tip of the bow and the
other end supplied with a loop. The board should then be driven
into the ground to the depth of about eight inches. We will next
take up the arrow. Pass the barb through the hole in the board
and adjust the notch over the bow-string, draw the arrow back and
release the string. If the arrow slide easily and swiftly, through
the board, keeping true to its aim, the contrivance is in perfect
working order and is ready to be set. This is accomplished by the
very simple and ingenious mechanical arrangement, shown at (b).
On
the under side of the arrow just behind the barb, a flat notch
one eighth of an inch in depth and two and a half inches in length
is cut, with rounded ends, as seen in the illustration. The bait
stick should consist of a sapling about three feet in length, the
large end being trimmed so
as to fit in the hole over the arrow while the notch in the latter
rests in the bottom of the aperture as seen in the illustration
 (b). The trap may then be set. Draw back the arrow, until
the notch rests in the hole in the board. Insert the bait stick
very lightly above the arrow as shown at (b),
propping
it in place at the angle seen in the main drawing. The bait for a
puma should consist of a portion of some carcass, or if for other
animals, any of the baits given in our section on "trapping" may
be used. In order to secure the bait firmly to the bait stick, a
small hole and a peg at the side of the baited end will
effectually
prevent its removal and the trap will thus most surely be sprung.
The prop which sustains the bait stick need be only a small crotch
inserted a little to one side of the trap. The bow should now be
surrounded by a wide pen, allowing room for the spring of the
ends.
The top of the enclosure should also be guarded by a few sticks or
branches laid across. Directly in front of the trap and extending
from it, a double row of rough stakes three feet high should be
constructed, thus insuring an approach in the direct range of the
arrow. Without this precaution the bait might be approached from
the side, and the arrow pass beneath the head of the animal,
whereas
on the other hand it is sure to take effect in the neck or breast
of its victim. Of course the success of this trap depends entirely
upon the strength of the bow. When a large and powerful one is
used its effect is almost surely fatal.
(b). The trap may then be set. Draw back the arrow, until
the notch rests in the hole in the board. Insert the bait stick
very lightly above the arrow as shown at (b),
propping
it in place at the angle seen in the main drawing. The bait for a
puma should consist of a portion of some carcass, or if for other
animals, any of the baits given in our section on "trapping" may
be used. In order to secure the bait firmly to the bait stick, a
small hole and a peg at the side of the baited end will
effectually
prevent its removal and the trap will thus most surely be sprung.
The prop which sustains the bait stick need be only a small crotch
inserted a little to one side of the trap. The bow should now be
surrounded by a wide pen, allowing room for the spring of the
ends.
The top of the enclosure should also be guarded by a few sticks or
branches laid across. Directly in front of the trap and extending
from it, a double row of rough stakes three feet high should be
constructed, thus insuring an approach in the direct range of the
arrow. Without this precaution the bait might be approached from
the side, and the arrow pass beneath the head of the animal,
whereas
on the other hand it is sure to take effect in the neck or breast
of its victim. Of course the success of this trap depends entirely
upon the strength of the bow. When a large and powerful one is
used its effect is almost surely fatal.
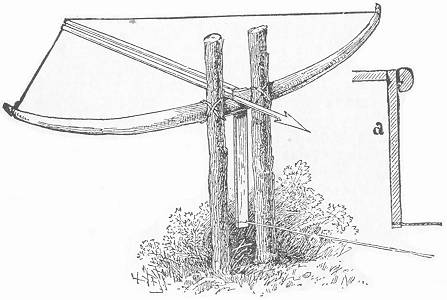
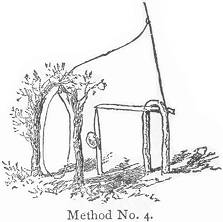
Another form of the bow trap, much used in the capture of the tiger, forms the subject of our next illustration: no bait is here used. The trap is set at the side of the beaten path of the tiger and is sprung by the animal pressing against a string in passing. The bow is large and powerful and is secured to two upright posts about eight inches apart. The string is drawn back and a blunt stick is then inserted between the bow string and the inside centre of the bow, thus holding the latter in a bent position. A stout stick, with a flattened end is next inserted between the end of the blunt stick and the inside of the bow, the remaining part of the stick extending downwards, as our illustration shows. To the lower end of this stick a string is attached and carried across the path in the direct range of the arrow, being secured to a stake on the opposite side. The arrow is generally barbed with a steel or flint point, and wound with thread saturated with a deadly poison. This is now rested on the top of the bow between the upright parts, and its notch caught in the bow-string. Everything is then in readiness. The tiger soon steals along his beaten track. He comes nearer and nearer the trap until at last his breast presses the string. Twang, goes the bow and the arrow is imbedded in the flesh of its victim. He writhes for a few moments, until he is released from his torments by the certain death which follows the course of the poison through his veins.
The use of the poison is very dangerous: a mere scratch through the skin is likely to prove fatal, and the trapper is thus likely to prove his own victim. Poisoned arrows are little used by trappers; and the bow trap, when properly constructed, is sufficiently effective without the venom.
The Deadfall (Camp Life in the Woods)

This is the famous harpoon trap, so commonly used in Africa for the capture of the hippopotamus. There is no reason why it may not be successfully employed in our own country for taking large game, or modified on a reduced scale for smaller animals.
The hippopotamus makes his daily rounds in regular beaten pathways; and the trapper, knowing this peculiarity, turns it to advantage. This is a common habit with many animals; and these "runways" are easily detected by the matted leaves and grass and the broken twigs. Over such a beaten track the harpoon-trap is suspended.
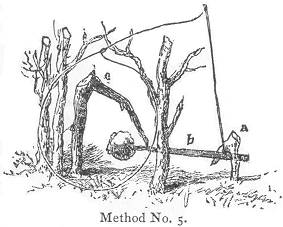
The harpoon used by the native African trappers somewhat resembles a double-barbed arrowhead, and has a reflexed prong on the shaft just behind the barbs,—a sort of combination between a spear and a fish-hook. It is a terrible weapon; and, when once launched into the flesh of its victim, its withdrawal is impossible, on account of the reflexed barb. Any sharp steel shaft will answer the purpose of the harpoon; it should be eight or ten inches in length, and filed to a keen point. We will now construct the trap. The first requisite is a straight section of the branch of some tree. This should be about four inches in diameter, and four feet in length. Into one end of this beam the harpoon should be firmly imbedded, allowing the point to project about six inches. This beam should then be weighted with two large stones, attached firmly by a rope, about eighteen inches above the harpoon. At about six inches from the other end of the log a notch should be cut, having its flat side uppermost, as shown plainly in our illustration. The implement is now ready.
Select some favorably situated tree, whose branches extend over the pathway chosen for the trap. By the aid of a rope secured to the log, and thrown over the limb, the weighted beam may be drawn up into the tree. While thus held by a person below, the trapper should climb the tree to complete operations. For this purpose, a smaller branch about three feet in length should be cut. One end should be flattened off on both sides, so as to fit in the notch in the beam; and the part which rests on the limb, as seen in the illustration, should also be flattened to prevent turning. A piece of stout Indian twine should next be fastened to the unwhittled end of the stick, which may then be adjusted in the notch of the harpoon beam, as seen in the engraving. The string may then be thrown down, and grasped by the companion below, who holds it firmly, after which the original rope may be removed. It will be noticed that the weight of the harpoon and accompaniments rests on the short arm of the lever which passes over the limb of the tree, and the tension on the string from the long arm is thus very slight. This precaution is necessary for the perfect working of the trap. To complete the contrivance, a small peg with a rounded notch should be cut, and driven into the ground directly plumb beneath the long end of the lever. It should be inserted into the earth only sufficiently to hold the string without pulling out, and the side of the notch should face the path; its height should be about a foot. Into the notch the string should be passed, being afterwards drawn across the path and secured on the opposite side at the same height. The trap is now set; and woe to the unlucky quadruped that dares make too free with that string! A very slight pressure from either side is equally liable to slip the string from the notch, or loosen the peg from the ground; and the result is the same in either case,—down comes the weighted harpoon, carrying death and destruction to its victim.
For large animals, this mode of setting will be found to work perfectly. When constructed on a smaller scale, it may be slightly modified. It will be noticed that, when the string is approached from one side, it is merely slipped out of the notch,—a slight pressure being sufficient to dislodge it,—while the pressure from the opposite direction must be strong enough to lift the peg out of the ground bodily. This is easily done when the peg is lightly inserted; but, to insure success, even with light pressure from either side, an additional precaution may be used, if desired. Instead of fastening the end of the string securely to some object on the further side of the path, it is well to provide the end of the cord with a ring or loop, which should be passed over a nail or short peg driven in some tree or branch, or fastened into an upright stake, firmly embedded into the ground. The nail should point in the opposite direction from the notch in the peg, and its angle should incline slightly toward the path. It will thus be seen that an approach from one side forces the string from the notch in the peg, while an opposite pressure slides the ring from the nail.
This mode of setting is especially desirable for small animals, on account of its being more sensitive.
Such a trap may be successfully used for the puma, bear, and the lynx. When constructed for smaller animals, the harpoon may be dispensed with, a large stone being equally effective in its death-dealing qualities
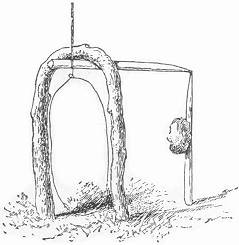
The "Twitch up" (Camp Life in the Woods)
Our next example of the snare, we imagine, is one which all our boy-readers will immediately recognize; for it would certainly seem that any country boy who does not know the "Twitch-up" must be far behind the times, and live in a locality where there are no rabbits, quail, or even boys, besides himself, to suggest it. This snare is a universal favorite among nearly all country boys, and our illustration will immediately bring it to mind. Its name, "The Twitch-up," conveys perfectly its method of working. Our illustration represents the trap as it appears when set. It has many varieties, of which we will select the best. They may be divided into two classes—those with upright nooses, and those in which the noose is spread on the ground, the latter of which are commonly called "ground snares." We will give our attention first to the "upright" style. These are rather entitled to preference on account of the harmless death which they inflict, invariably catching by the neck. Whereas the ground nooses as frequently lift their prey into the air by their feet, and thus prolong their suffering. Twitch-ups are the most successful and sure of any snares, and that, too, without being complicated. The writer, in his younger days, was quite an expert in trapping, and he can truthfully say that he found more enjoyment and had better success with these than with any other kinds of traps he employed.
They are generally set in thickets or woods where either rabbits or partridges are known to abound. Having arrived at his chosen trapping ground, the young trapper should first select some slender, elastic sapling; that of the hickory is the best, and is generally to be found in open woods—if not, some other kind will answer very well. It should be about five or six feet in length, (trimmed of its branches,) and in diameter need be no larger than an axe-handle or a broom-stick. When this is decided, some spot about five feet distant from the sapling should then be selected. The hatchet and knife will now come into excellent use, in cutting the sticks for the little inclosure shown in our drawing. This should be about eight or ten inches in diameter, and of about the same height. The sticks should be driven into the ground in a circle, leaving an open space of about six inches on one side. A stout switch as large as a man's little finger, and nearly two feet long, should then be cut and nicely sharpened at both ends. This should then be driven into the ground in the form of an arch, at the opening of the in closure.
We will now ask our readers to turn their attention to the next illustration, in order to understand what is to follow. This picture shows the method of setting the trap.
After the arch is firmly fixed in its place, a short piece of
stick
should be cut, of a length corresponding to the height of the
arch.
To the middle of this stick the bait should be attached, being
 either tied to it or stuck on a plug driven into the stick, the
latter being sharpened on one end. Next proceed to cut another
stick, of about six inches in length; let this be flattened on
one end. The wire noose should then be fastened to the opposite
end. The noose in this case should be large enough to fill the
opening of the arch. We will now go back to the sapling again.
It should be bent down slightly, and a piece of the strong twine
should be tied to its tip. Taking hold of the string, proceed to
bend down the end of the sapling, in the direction of the
inclosure,
until it draws with a force strong enough to lift a rabbit if he
were tied to the end of it. Thus holding it down with the string
against the front of the inclosure, cut off the twine at the place
where it crosses the top of the arch, as this will be the required
length. It is now necessary to tie the end of this string to the
same piece of wood and at the same place to which the noose was
tied. When this is done the trap may be set as shown in the cut.
The spring sapling should be bent as seen in the first
illustration.
The piece of wood holding the noose should be passed beneath the
top of the arch, as far as it will go, with its long end pointing
inside the inclosure. By now supporting the inside end with the
bait stick, and carefully adjusting the noose so as to completely
fill the arch, the trap will be set.
either tied to it or stuck on a plug driven into the stick, the
latter being sharpened on one end. Next proceed to cut another
stick, of about six inches in length; let this be flattened on
one end. The wire noose should then be fastened to the opposite
end. The noose in this case should be large enough to fill the
opening of the arch. We will now go back to the sapling again.
It should be bent down slightly, and a piece of the strong twine
should be tied to its tip. Taking hold of the string, proceed to
bend down the end of the sapling, in the direction of the
inclosure,
until it draws with a force strong enough to lift a rabbit if he
were tied to the end of it. Thus holding it down with the string
against the front of the inclosure, cut off the twine at the place
where it crosses the top of the arch, as this will be the required
length. It is now necessary to tie the end of this string to the
same piece of wood and at the same place to which the noose was
tied. When this is done the trap may be set as shown in the cut.
The spring sapling should be bent as seen in the first
illustration.
The piece of wood holding the noose should be passed beneath the
top of the arch, as far as it will go, with its long end pointing
inside the inclosure. By now supporting the inside end with the
bait stick, and carefully adjusting the noose so as to completely
fill the arch, the trap will be set.
IIn order to reach the bait, the rabbit or bird must necessarily pass its head through the noose, after which, if the bait be scarcely touched, the animal's doom is sealed, and he is lifted into the air, generally suffering almost instant death. It is well known that in the case of a rabbit the neck is broken by a very slight blow, a strong snap of the finger being often sufficient. It is therefore safe to conclude that when thus suddenly caught and lifted by the noose, death must occur almost instantaneously from the same cause.
It is not really necessary for success that the force of the sapling should be strong enough to lift the rabbit from the ground, as a mere strong tightening of the noose would be sufficient to cause strangulation and death. But we recommend the former method as being less painful and more rapid in its effects.
If the young trapper should experience any difficulty in finding saplings of the right size, in the locality where he desires to set his traps, the difficulty may be easily mended by cutting the poles elsewhere, and carrying them to his trapping-ground, this answering the purpose equally well. They should be sharpened nicely on the large end, and firmly stuck into ground. The "Twitch-up" may be used for the capture of all varieties of game, and when set with the noose in the opening of a hollow tree, a stray coon will occasionally be entrapped.
The next figure represents another method of constructing this
trap, The picture explains itself. Instead of the arch, two
notched
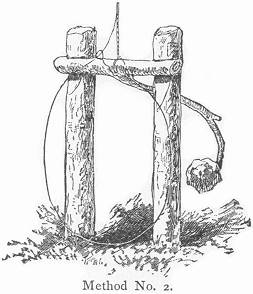 sticks are driven into the ground, one on each side of the opening
of the pen, The other piece should be of the shape shown in the
figure, made either in one piece or in two pieces fastened
together.
They may all be constructed from twigs in the woods. Let the noose
and draw-string now be fastened to the middle of the cross piece,
and when set it will appear as in our figure. It will easily be
seen that a slight pull on the bait will turn the cross piece from
beneath the notches, and allow it to fly into the air.
sticks are driven into the ground, one on each side of the opening
of the pen, The other piece should be of the shape shown in the
figure, made either in one piece or in two pieces fastened
together.
They may all be constructed from twigs in the woods. Let the noose
and draw-string now be fastened to the middle of the cross piece,
and when set it will appear as in our figure. It will easily be
seen that a slight pull on the bait will turn the cross piece from
beneath the notches, and allow it to fly into the air.
In our next instance the same principle is employed. The
notched pegs are here driven in the back part of the pen, about
 five inches apart, with their notches towards the front. A forked
bait stick of the shape shown is then procured. The draw-string
should be attached near the end furthest from the fork. By now
inserting the ends lightly beneath the notches in the pegs, at
the same time letting the bait incline near the ground, the trap
will be set on a very slight lift, as the bait will dislodge the
pieces. Of course the noose must be arranged in the opening of the
pen, as in the previous varieties. The bait stick in both cases
should be set cautiously beneath the notches, as shown at (a),
so
that the slightest turn will cause it to roll out of position.
five inches apart, with their notches towards the front. A forked
bait stick of the shape shown is then procured. The draw-string
should be attached near the end furthest from the fork. By now
inserting the ends lightly beneath the notches in the pegs, at
the same time letting the bait incline near the ground, the trap
will be set on a very slight lift, as the bait will dislodge the
pieces. Of course the noose must be arranged in the opening of the
pen, as in the previous varieties. The bait stick in both cases
should be set cautiously beneath the notches, as shown at (a),
so
that the slightest turn will cause it to roll out of position.
A fourth method of snaring is shown in our next figure. In this
instance the original arch is used, or else some circular opening
constructed in the front of the pen. Inside, at the back part of
the inclosure, a smaller arch is placed. Two sticks are then to
be made similar to those mentioned in our first example of the
"Twitch-up." Let the draw-string be tied to the end of one of
these
sticks; after which it should be passed under the inside arch,
being
brought out in front of it, and there supported by the bait-stick,
as seen in our illustration. The noose should then be attached
 to the draw-string above the pen, and afterward brought down and
arranged in front of the opening. The trap is then set, and will
be found on trial to work admirably.
to the draw-string above the pen, and afterward brought down and
arranged in front of the opening. The trap is then set, and will
be found on trial to work admirably.
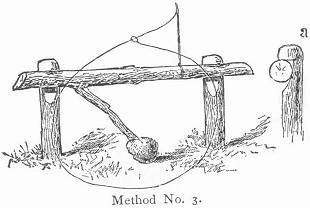
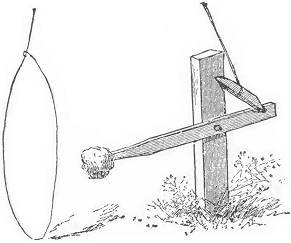
One of the simplest as well as surest of "Twitch-up" traps
forms the subject of our next illustration. Like the foregoing
varieties it is of course to be surrounded by its pen, and
supplied
with a circular opening or arch at one side, in which to hang the
noose. It is constructed of three twigs. A simple crotch (a)
should be firmly inserted in the ground at
 the back part of the pen; (b) the bait stick, consists of a
straight twig, five or six inches in length, and should be
attached
to the draw-string at about half an inch from the large end; (c)
is another forked stick with unequal arms, the long one being
driven
into the ground near the opening of the pen and a little to one
side,
letting the remaining arm point directly towards the crotch-stick
at the back of the pen. The noose having been attached to the
draw-string, the trap may now be set. Lower the bait stick and
pass
the large end under the crotch at the back of the pen, catching
the baited end underneath the tip of the forked stick near the
pen's opening. Arrange the noose in front of the entrance, and
the thing is done. A mere touch on the bait will suffice to throw
the pieces asunder. It is an excellent plan to sharpen the point
of
the forked stick (c) where it comes in contact with the
bait
stick, in order to make the bearing more slight, and consequently
more easily thrown from its balance.
the back part of the pen; (b) the bait stick, consists of a
straight twig, five or six inches in length, and should be
attached
to the draw-string at about half an inch from the large end; (c)
is another forked stick with unequal arms, the long one being
driven
into the ground near the opening of the pen and a little to one
side,
letting the remaining arm point directly towards the crotch-stick
at the back of the pen. The noose having been attached to the
draw-string, the trap may now be set. Lower the bait stick and
pass
the large end under the crotch at the back of the pen, catching
the baited end underneath the tip of the forked stick near the
pen's opening. Arrange the noose in front of the entrance, and
the thing is done. A mere touch on the bait will suffice to throw
the pieces asunder. It is an excellent plan to sharpen the point
of
the forked stick (c) where it comes in contact with the
bait
stick, in order to make the bearing more slight, and consequently
more easily thrown from its balance.
The Poacher's Snare (Camp Life in the Woods)
Our next example represents one of the oldest and best snares in existence,—simple in construction, and almost infallible in its operations. It is the one in most common use among the poachers of England, hence its name. The pieces are three in number, and may be cut from pine wood, affording easy and profitable employment for the jack-knife during odd hours and rainy days, when time hangs heavily.
The pieces are so simple in form and easy of construction that a sufficient number for fifty traps might be whittled in less than two hours, by any smart boy, who is at all "handy" with his jack-knife.
If a few good broad shingles can be found, the work is even much
easier,—mere splitting and notching being then all that is
necessary. The bait stick should be about eight inches long,
pointed
at one end, and supplied with a notch in the other at about half
an inch from the tip. The upright
stick should be considerably shorter than the bait stick, and have
a length of about ten inches, one end being nicely pointed, and
the
broad side of the other extremity supplied with a notch similar
 to the bait stick. About four inches from the blunt end, and on
the
narrow side of the stick, a square notch should be cut,
sufficiently
large to admit the bait stick loosely. The catch piece now
remains.
This should be about two and a-half inches in width, and bevelled
off at each end into a flat edge. The shapes of the different
pieces,
together with their setting, will be readily understood by a look
at our illustration.
to the bait stick. About four inches from the blunt end, and on
the
narrow side of the stick, a square notch should be cut,
sufficiently
large to admit the bait stick loosely. The catch piece now
remains.
This should be about two and a-half inches in width, and bevelled
off at each end into a flat edge. The shapes of the different
pieces,
together with their setting, will be readily understood by a look
at our illustration.
A hundred of these pieces will make a small bundle, and may be easily carried by the young trapper, together with his other necessaries, as he starts off into the woods. He will thus be supplied with parts for thirty-three traps, all ready to be set, only requiring the stakes for the pens, which may be easily cut in the woods. Having selected a flexible sapling about five feet in length, and having stripped it of its branches, proceed to adjust the pieces. Take one of the upright sticks, and insert it firmly in the ground, with its upper notch facing the sapling, and at about four feet distant from it. Bend down the "springer," and by its force determine the required length for the draw-string attaching one end to the tip of the sapling, and the other near the end of a catch piece, the latter having its bevelled side uppermost. The wire noose should then be attached to the draw-string about six inches above the catch-piece. The pen should now be constructed as previously directed. Its entrance should be on the side furthest from the springer, and should be so built as that the peg in the ground shall be at the back part of the enclosure. The pen being finished, the trap may be set.
Insert the bait stick with bait attached into the square notch in the side of the upright peg; or, if desired, it may be adjusted by a pivot or nail through both sticks, as seen in our illustration, always letting the baited end project toward the opening. Draw down the catch piece, and fit its ends into the notches in the back of the upright peg and extremity of the bait-stick. By now pulling the latter slightly, and gently withdrawing the hand, the pieces will hold themselves together, only awaiting a lift at the bait to dislodge them. Adjust the wire loop at the opening of the pen, and you may leave the trap with the utmost confidence in its ability to take care of itself, and any unlucky intruder who tries to steal its property.
Most of the snares which we shall describe are constructed from rough twigs, as these are always to be found in the woods, and with a little practice are easily cut and shaped into the desired forms. If desired, however, many of them may be whittled from pine wood like the foregoing, and the pieces carried in a bundle, ready for immediate use. In either case, whether made from the rough twigs or seasoned wood, it is a good plan to have them already prepared, and thus save time at the trapping ground when time is more valuable.